
A favorite customer popped into the shop recently and asked for tips about pressing quilt blocks. Here is a sharing of some different pressing tips that I have learned and used along the way. ALL of these have all been talked about & learned by most of you at one time or another,. but I guess it never hurts to review some of the basic things that can help us make our finished quilt projects come out neat and as close to perfect as a girl can manage to get them.☺
Read on and if you try some of these tips, let me know if you achieve a more righteous quilt block then you did beforehand. (Use the comments section below. Oh and please share any other tips or suggestions that you can think of.)
PRESSING Q & A

Which brand of iron is the best?

- Any brand of iron that gets hot and stays hot will work.
Should I use steam?
- Steam is personal preference. Use steam, OR if you like to use a dry iron, keep a spray bottle of water handy for those stubborn creases.
Should I use starch?
- Starch or spray product like Best Press, can also be a personal choice . They can keep your piecing crisp and square as you work and are certainly optional, and not a 'must-do' part of quilt block pressing. There are some types of patch work that are going to benefit from using a starch product. For instance I do like to get out starch (or a similar spray product ) when I am working with really small pieces, OR when the cotton fabrics I am piecing seem especially soft or unstable.

UNFOLDED FAT QUARTER NEEDS YOUR PRESSING ATTENTION
PRESS BEFORE CUTTING?
- Pressing fabric that has comes off the bolt, or has been folded as a Fat Quarter, or scraps that have been bunched up, is important before cutting into it. Fabric that has been on the bolt is almost always creased sharply at the fold.
- Quilters like who pre-wash their yardage find that pressing it when fabric comes out of the laundry is often a necessity. If you pre-wash and are going to press the entire length of your yardage, Consider using steam and starch, this can really help avoid problems later. Avoid the dreaded strip "elbow" and get your yardage smoothed out before cutting
Why is the seam that I stitched as a straight line now a curve?
- This can happen when you are IRONING and not PRESSING. If straight seams are now curved, or strip sets are no longer straight, then too much pressure is being applied and the iron is being pushed across the fabric.
- PRESSING requires a motion where you bring your iron straight down onto your fabric from above with light pressure, letting the heat of your iron do the work. It is the best way to press the seams of your quilt blocks.
- IRONING is a motion where you have placed your iron onto your fabric and you are moving the iron to to and fro and from side to side without lifting it off of the fabric very much. It works well when you are ironing the folds out of your new fat quarters and yardage, or when you have just fetched a wadded up ball of scrappy bits from one of your stash bins and you need to get them put back to rights before cutting out some quilt pieces. Also it's how you would use your iron on clothing - but it is not the best motion for ironing quilt blocks as it may distort your seams.
- If you are getting distortion when pressing strip sets, try laying the strip set on top of a striped fabric to see where things are not staying straight. Lining up the strip set along the printed stripes of the fabric will help you to straighten it out again.

SETTING THE STITCHES FIRST
- Do this step first to get straight, flat seams:
- press the seam while closed, before pressing to the side ( or pressing open if that's what you are doing). Leaving your patchwork unit just as you have sewn it , press along the stitching line.Your stitches are set in place and the seam is nice and flat.
PRESSING SEAM ALLOWANCES TO THE DARK SIDE?
- It's always a help to me when a pattern shows which direction is best to press your seam allowances . It can be a simple note usually saying that seams should be pressed toward the dark fabric, or a pattern may have more detailed instructions, sometimes including illustrations with arrows (my favorite). Pressing seam allowances toward the dark keeps the darker colors from "shadowing through" the lighter colors when the quilt is finished.
NESTING SEAMS
- When seam allowances are pressed toward the darker fabric THEY will then face opposite seam allowances on the piece that they will be sewn to when building your block. Having seams nest, or face away from each other at intersections helps to reduce bulk and increase accuracy. Reducing bulk at intersections will help your completed block come out to be the right size.

- Do we ever NOT press our seams towards the darker fabric?
- Sure ! - A quilt pattern may tell you to press your seams in a specific direction You may find that you will have to press some seams away from the darker fabric so that you can "nest" your seams when needed.

PRESS TO THE DARK SIDE: START WITH DARK FABRIC ON TOP, FINGER PRESS OPEN, SET WITH HOT IRON.
ON THE BACK OF YOUR PIECE THE SEAM ALLOWANCE IS NOW PRESSED TOWARDS THE DARKER FABRIC ☺
PRESSING SEAM ALLOWANCES OPEN?
- If your pattern calls for pressing seam open, should you? Yes- whoever wrote this pattern knows this particular quilt block will work well within the quilt & look its best with the seams pressed open. HOWEVER- Pressing all your seams open, for all your work, all the time is not the best practice. Seams that have been pressed open are not as strong or durable as seam allowances that have been pressed to the side. But when your pattern or situation calls for pressed open seams try these tips:
- Using the tip of the iron, or a TOOL to open the seam will prevent burns to finger tips. Go slowly, and with a light touch. Too much pressure will distort your seam.
- Turn the patchwork over and press again from the front to really set everything into place. Open seams can reduce bulk and bumpy intersections in some types of piecing.


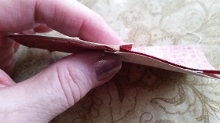
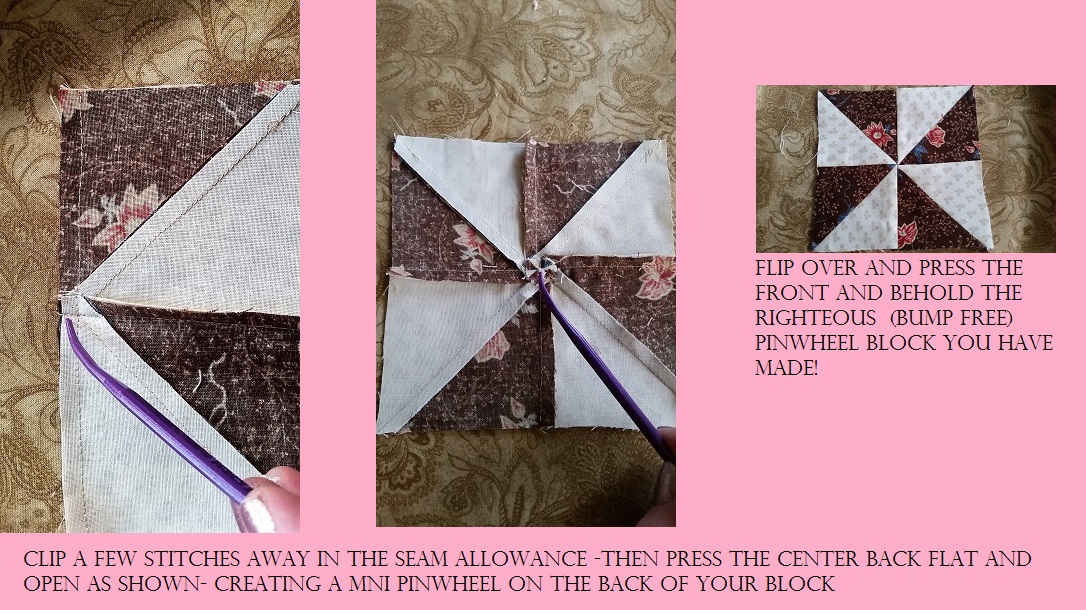
PRESSING SEAM INTERSECTIONS- tips:
- If you have ever struggled with a bump in the middle back of your quilt block? These two bump reducing techniques may help.
- MINI 4-PATCH CENTER: on the back of a 4-Patch unit you will see that there are a couple of threads keeping the two middle seams together. Clip out only those couple of threads stitched just into the seam allowance. Now press the clipped seams in two different directions. This pressing creates a miniature 4-Patch design which helps reduce that 'bump' in your block.

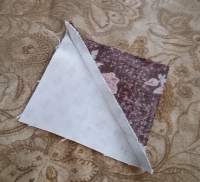
- TRIANGLE or PINWHEEL CENTER- This works in the same way to reduce bulk (as shown above ) for the back of a half square triangle block (or pinwheel block). Clip those few threads in the seam allowance on the back of your block, press the seam allowances in opposing directions - This pressing creates a miniature pinwheel on the back of your block and really does reduce bulk and minimize the bump on the front of your block.

Going over these tips for this blog post got me back into a grove of better pressing habits again. Here's a block I just finished for a new Block of the Month we are getting ready to start. Click on the picture to read more about this new BOM program.
Please use the comments area below to share any other tips or suggestions that you can think of.
Thank you for reading, until we blog again, take some time to Enjoy the Sew!® - Carol

SIGN UP HERE IF YOU'D LIKE TO RECEIVE AN EMAIL WHEN A NEW BLOG POST IS PUBLISHED