FEATURING SHARKTOWN FABRICS FROM #RILEYBLAKEDESIGNS

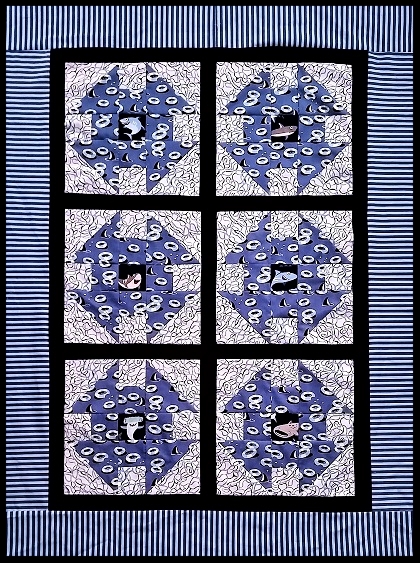
Sharktown Dash Quilt 40" x 54"
Make this quick baby quilt, perfect for summertime naps, play or a gift for that special little one. This quilt features Sharktown fabrics by Shawn Wallace for Riley Blake Designs
It is so much fun to have this playful Riley Blake collection in the quilt shop this summer. I stitched up this campshirt and sundress (with matching doll dress) using patterns from Olive Ann and Fishsticks .

Summertime togs for your toddler.
These fabrics are adorable so I couldn't stop there. I wanted to make a quilt with Sharktown . I wanted it to be something easy and sized right for little ones.
We have been featuring the churn dash block in our summer programs here in the shop this year, so I started my design with that . I plumped up the size of the block pieces to make it quick to do and to feature the prints in the collection without cutting them into squares that were too small, and the Chubby Churn Dash block was the result

SHARKTOWN + CHURN DASH = SHARKTOWN DASH
The Sharktown Dash Quilt is so quick to make you'll have it put together in no time at all. Start with some of fabric designer Shawn Wallace's Sharktown collection - stitch up six chubby churn dash blocks, add sashing, borders and you get this sweet Sharktown Dash quilt. (you could add more chubby churn dash blocks for a bigger quilt).

I fussy cut the 3" x 3" center squares
Sewing the 6 blocks:
Start by making 24 Half Square Triangle (HST) units using the 5 7/8" block squares and background squares.

Take one background square and one blue block square . Place squares RST (notice how my blue block fabric has a directional print)

Draw a diagonal line on the back of the light squares. Please note that because my blue block fabric is directional , I need to draw one of my diagonal lines in the opposite direction of the other line, This will keep all my HST positioned correctly in the finished block.....or it is much easier to say it keeps all my sharks swimming in the right direction ☺

Stitch 1/4" seam on either side of your drawn line.

Cut apart on the drawn line.

Press your HSTs open and position them as shown.

Arrange your HSts, the 3" center square, four 3" blue block squares and four 3" background squares as shown.

Sew all the block pieces together and press well, Square up your blocks to 13" x 13" (unfinished size)
quilt assembly
Use the diagram below to add your sashing strips and outer borders.

Quilt assembly diagram.
Layer your quilt top with batting and backing. Quilt as desired.
Bind, add a label and enjoy your finished quilt.
I quilted bubbles all over to finish my quilt.
Thank you so much for reading this blog post. If you decide to make this quilt, I hope you have as much fun as I did,
Until we blog again take time out to Enjoy the Sew!®- Carol
SIGN UP HERE TO RECEIVE AN EMAIL WHEN A NEW BLOG POST IS PUBLISHED: