There are only a handful of days left in February, but here at RockingChairQuilts.com we’re not done sharing heart projects yet. Here is today’s offering for @modafabrics month long maker to maker celebration #handmadeheartaday. Of course hearts are the go to shape for Valentines, but these sweet shapes add love and cheer to anything you could think of making. Today we ‘ve plugged Crystal Manning’s @cmanningsews Garden Society fabrics into our heart design. Because Springtime.
Read more♥ Vintage Twisted Valentine ♥
Here is another heart project to enjoy for @modafabrics #handmadeheartaday 2023. Today we are sharing our free pattern for our Vintage Twisted Valentine quilt.. It's ‘twisted’ because you will need a twister ruler to make this quilt. It’s ‘vintage’ because of the fabrics we chose. You could make it ‘Modern Twisted Valentine’ or ‘ Floral Twisted Valentine’ or ‘My Valentine Made Me Blue'.....
Read more♥ Churning for You ♥
FREE VALENTINE PATTERN
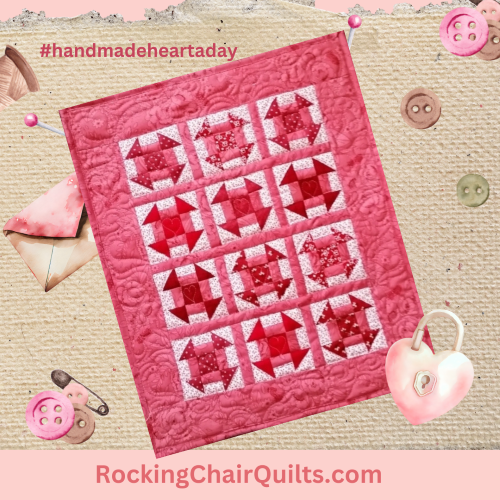
Happy Valentine's! Get a vintage vibe going for @modafabrics #handmadeheartaday 2023, Today we are re-visiting our darling mini Churn Dash quilt pattern. It's a scrappy happy little quilt. These miniature blocks (3" finished) don't need very big amounts of fabric to complete. You can probably find the fabrics you'll need in your scrap box.
A little more fabric is needed for the sashing and borders & binding -1/2 yard should do.
A Fat Quarter is enough for backing on this wee quilt.


For Valentine's I am starting with a pile of pinks, reds and some lights for background in my blocks. Look at all that delicious Moda Fabric! This mini would be charming made up in brights, low volume, civil war, ....almost any fabric that makes your quilter's heart happy♥
You'll need to make some Half Square Triangles (HSTs) for your mini Churn Dash blocks. In this tutorial I will showcase using the Creative Grids 4 in 1 Half Square Triangle Ruler CGRBH1 to make my HSTs......But you can create your your HST using any method you like for your little quilt. As long as they will finish to 1" x 1" size .
♥♥CHURNING FOR YOU ♥♥
Valentine Mini Pattern from RockingChairQuilts.com
14 ½” x 18” finished Size
Tools: Rotary cutter, straight ruler and cutting mat
Threads to match or any color of thread that makes you happy today☺
Fabrics:
Assorted scraps for blocks
½ yard for Border, blocks, sashing, binding:
Cutting:
Cut two 2 ½” x WOF (border)
Cut two 2 ½” x WOF (binding)
Cut three 1” x WOF (sashing)
*Cutting sizes for your Half Square Triangles in the blocks may vary depending on your preferred method of making HSTs.
Cut two 1” x WOF (blocks, cut in half at fold to make 4 pieces 1: x 21”)
Background -12” x 21” piece (or can be scrappy)
Cutting:
Cut four 1” x 21” (Blocks)
TO MAKE THE Half Square Triangles for your blocks use one of the following OPTIONS:
Use your OWN preferred method to make the 48 HST units. The HSTs need to finish at 1” square when sewn into your blocks.
If using the Creative Grids® Half-Square 4-in-1 Triangle Ruler - CGRBH1. FOR EACH BLOCK you will need to cut strips of background and prints 1 ½” x 5” and pair them RST then use your 4 in 1 ruler to cut your HST segments (see illustrated steps below) each 1 ½” x 5” strip will make 4 HSTs – enough for one churndash block. If you want 12 different blocks you can use 12 different prints with your background fabric or you could make all your blocks alike and use only one color print strip with your background strips, or any combination in between.
Use triangle paper that makes 1” finished size HST.
Cut three 1 7/8” x 21”, from these strips cut 24 – 1 7/8” squares then cut on the diagonal to make 48 triangles. These background triangles will then be paired with print triangles to make 4 half square triangle units (HST) for each of your 12 blocks.
Blocks – up to 12 different prints - you’ll need a piece 3 x 7 for each block
Cutting:
Cut one 1 ½” square from a variety of prints (this is the center square) you will need 12
See Step 1 under the background cutting. Whichever method you want to use to make 48 HSTs you will need to cut the same size and amount from your variety of prints as you cut have cut from your background fabric.
I used the Creative Grids 4 in 1 ruler so I will cut a strip 1 ½” x 5” for each block I want to make. In my sample quilt, I made two or 3 blocks from each of 5 prints until I had a total of 12 blocks
Backing – Fat Quarter will work for your backing

Sewing:

MAKE BARS AND BACKGROUND UNITS: Using the 1” x 21” background and border strips. Pair a background strip to a border strip and sew with ¼” seam allowance. Repeat to make a total of four. Cut the sewn strip sets into 48) 1 ½” segments. They should measure 1 ½” x 1 ½” when pressed open.
here’s how we used THE CREATIVE GRIDS 4 IN 1 RULER TO MAKe HALF SQUARE TRIANGLES
OR please use your go to method for HSTs
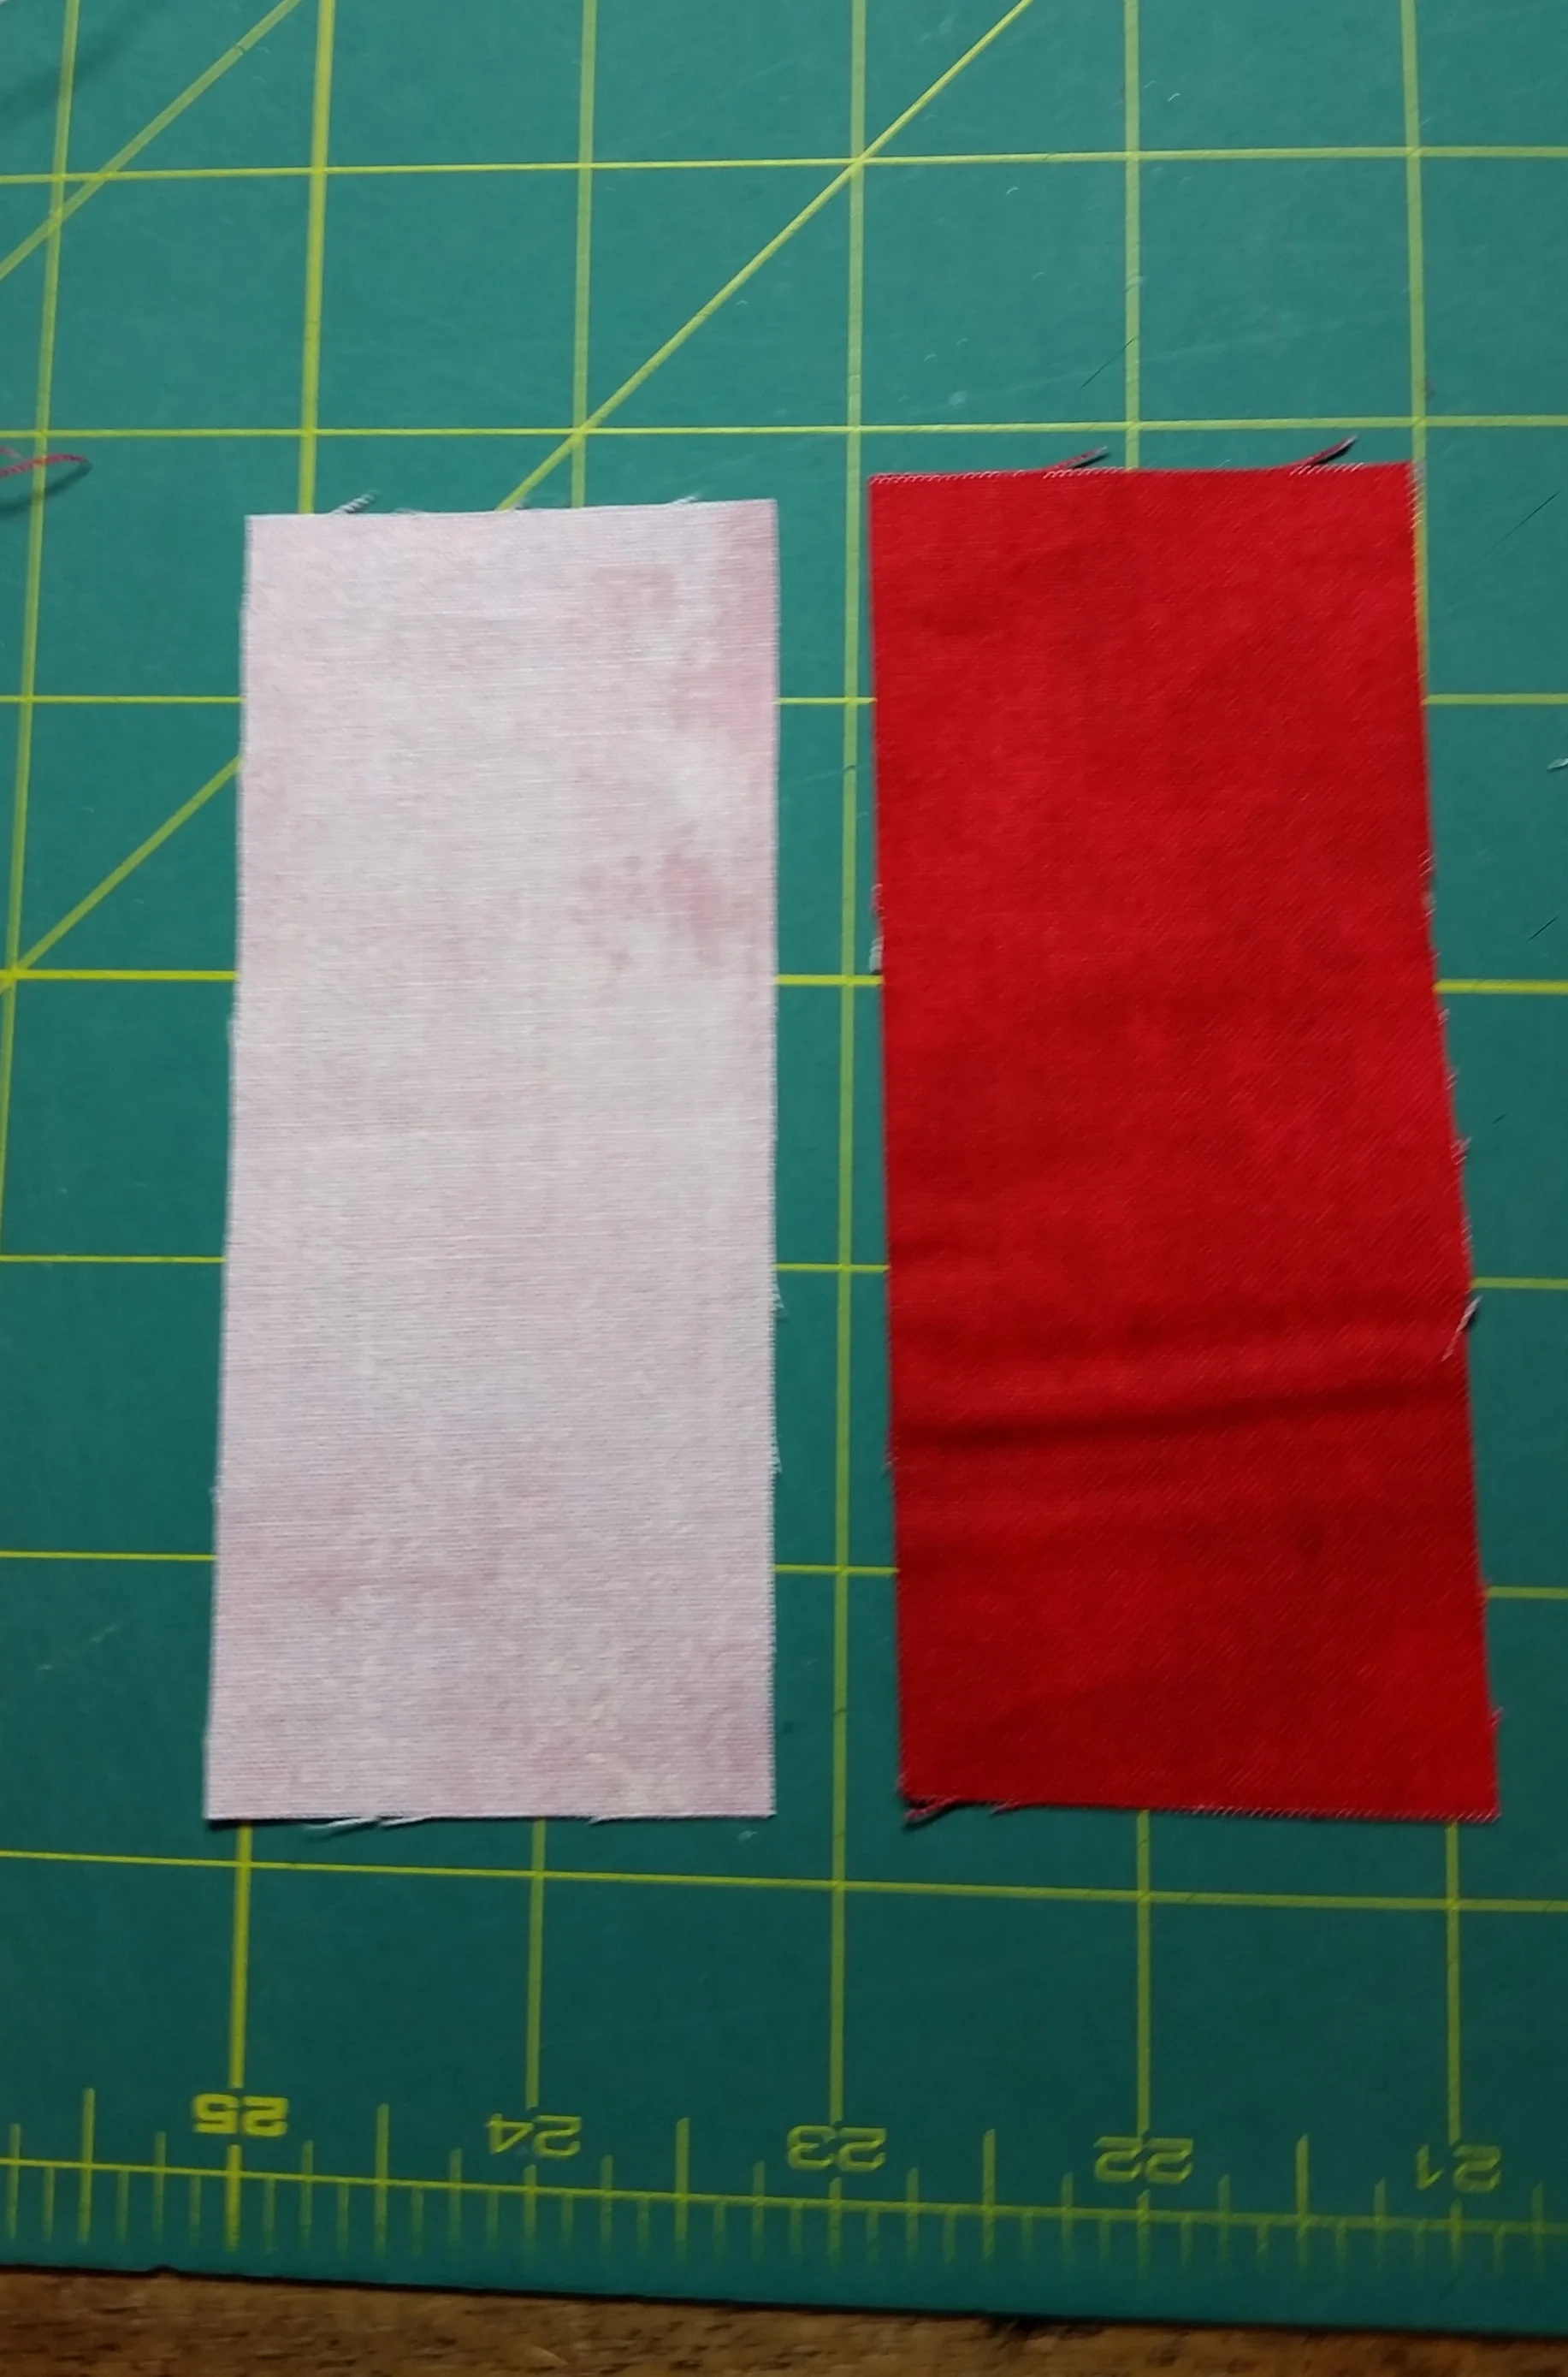


MAKING HALF SQUARE TRIANGLE UNITS (HSTs) Pair each print 1 ½” wide strip RST (right sides together) with a 1 ½” background strip. Use your CGR 4 in 1 ruler* to cut sets of triangles. Chain piece paired triangles using a ¼” seam along the longest edge of the triangle pair. Press open and admire your work ☺*refer to markings on the ruler OR the printed instructions that come with the ruler for placement before cutting
ASSEMBLE BLOCKS:
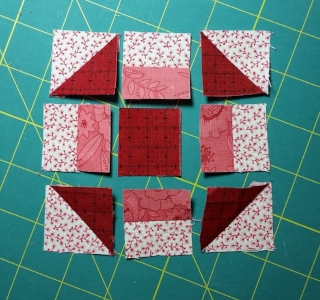
Place one 1 1/2" center square, 4 HSTs & 4 Bars and Background units as shown here.

Stitch together as shown, use 1/4" seams throughout. Press and square up to 3 1/2" (unfinished size) if needed. Make 12 Blocks
QUILT ASSEMBLY:

Layout your blocks in 4 rows of 3, in an arrangement that pleases you. Using a 1” x WOF sashing strip, Cut 8) 1” x 3 ½” pieces. Sew these pieces to the right side of the first 2 blocks in each row. Press toward the sashing. Sew the rows of 3 together and press toward the sashing. Using the rest of the 1” sashing strips sew a strip between the rows as pictured.
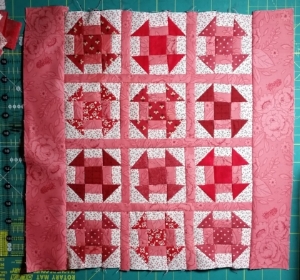
Add the 2 1/2" border strips to the sides, press towards the border

Add the 2 1/2" border strips to the top and bottom. Press to the border. Layer, quilt, bind and then LOVE your quilt♥

If you make this mini , we'd love to see your version, please share a photo with us:
WAYS TO SHARE a photo with us:
Post your photo on Instagram and tag us # rockingchairquilts and #handemadeheartaday
post your photo on our Facebook page- CLICK HERE to get to the Facebook page.
Tweet a photo @makeaquilt or tag us in your tweet @MakeAQuilt
send your photo in an email to us : info@RockingChairQuilts.com
Please use the comments area below for your comments or questions

Thank you for reading, until we blog again, take some time to Enjoy the Sew!® - Carol

SIGN UP HERE IF YOU'D LIKE TO RECEIVE AN EMAIL WHEN A NEW BLOG POST IS PUBLISHED
Moda's Bella Solids CLASSIC QUILTS SERIES
Free pattern is available on the RCQ blog today. Every other month this year, we have been sharing the pattern for a new quilt. Today is the last the of six Bella Classic Quilts, #6 Frost. Each classic pattern is a two-color quilt using Bella Solids.. We're showing all variety of colors, but you could easily make all of these in one color of your choice to build your own two-color quilt collection!
This quilt is Big Top, and the free pattern is available on the RCQ blog today!
Read moreModa's Bella Solids CLASSIC QUILTS SERIES
Free pattern is available on the RCQ blog today. New for 2022 Moda's Bella Solids CLASSIC QUILTS SERIES. Every other month of 2022, we've been sharing Moda's Bella Solids Classics Quilts Series. Each classic pattern is a two-color quilt using Bella Solids.. We're showing all variety of colors, but you could easily make all of these in one color of your choice to build your own two-color quilt collection!
This quilt is Big Top, and the free pattern is available on the RCQ blog today!
Read moreModa's Bella Solids CLASSIC QUILTS SERIES
New for 2022 Moda's Bella Solids CLASSIC QUILTS SERIES. The first quilt is available as a free pattern download on the blog today. A series of 6 classic 2 color quilts for you to enjoy. Every other month through 2022, we'll share the pattern for a new quilt. Today is Bella Classics quilt #1, titled Quintet.
Read more♥ ♥ ♥ Churning for You ♥ ♥ ♥
FREE VALENTINE PATTERN

Happy Valentine's! We are re-visiting our darling mini Churn Dash quilt pattern. It's a scrappy happy little quilt. These miniature blocks (3" finished) don't need very big amounts of fabric to complete. You can probably find the fabrics you'll need in your scrap box.
A little more fabric is needed for the sashing and borders & binding -1/2 yard should do.
A Fat Quarter is enough for backing on this wee quilt.
For Valentine's I am starting with a pile of pinks, reds and some lights for background in my blocks. Look at all that delicious Moda Fabric! This mini would be charming made up in brights, low volume, civil war, ....almost any fabric that makes your quilter's heart happy♥
You'll need to make some Half Square Triangles (HSTs) for your mini Churn Dash blocks. In this tutorial I will showcase using the Creative Grids 4 in 1 Half Square Triangle Ruler CGRBH1 to make my HSTs......But you can create your your HST using any method you like for your little quilt. As long as they will finish to 1" x 1" size .
♥♥CHURNING FOR YOU ♥♥
Valentine Mini Pattern from RockingChairQuilts.com
14 ½” x 18” finished Size
Tools: Rotary cutter, straight ruler and cutting mat
Threads to match or any color of thread that makes you happy today☺
Fabrics:
Assorted scraps for blocks
½ yard for Border, blocks, sashing, binding:
Cutting:
Cut two 2 ½” x WOF (border)
Cut two 2 ½” x WOF (binding)
Cut three 1” x WOF (sashing)
Cut two 1” x WOF (blocks, cut in half at fold to make 4 pieces 1: x 21”)
Background -12” x 21” piece (or can be scrappy)
Cutting:
Cut four 1” x 21” (Blocks)
TO MAKE THE Half Square Triangles for your blocks use one of the following OPTIONS:
If using the Creative Grids® Half-Square 4-in-1 Triangle Ruler - CGRBH1. FOR EACH BLOCK you will need to cut strips of background and prints 1 ½” x 5” and pair them RST then use your 4 in 1 ruler to cut your HST segments (see illustrated steps below) each 1 ½” x 5” strip will make 4 HSTs – enough for one churndash block. If you want 12 different blocks you can use 12 different prints with your background fabric or you could make all your blocks alike and use only one color print strip with your background strips, or any combination in between.
Use triangle paper that makes 1” finished size HST.
Cut three 1 7/8” x 21”, from these strips cut 24 – 1 7/8” squares then cut on the diagonal to make 48 triangles. These background triangles will then be paired with print triangles to make 4 half square triangle units (HST) for each of your 12 blocks.
Use your OWN preferred method to make the 48 HST units
Blocks – up to 12 different prints - you’ll need a piece 3 x 7 for each block
Cutting:
Cut one 1 ½” square from a variety of prints (this is the center square) you will need 12
See Step 1 under the background cutting. Whichever method you want to use to make 48 HSTs you will need to cut the same size and amount from your variety of prints as you cut have cut from your background fabric.
I used the Creative Grids 4 in 1 ruler so I will cut a strip 1 ½” x 5” for each block I want to make. In my sample quilt, I made two or 3 blocks from each of 5 prints until I had a total of 12 blocks
Backing – Fat Quarter will work for your backing
Sewing:
MAKE BARS AND BACKGROUND UNITS: Using the 1” x 21” background and border strips. Pair a background strip to a border strip and sew with ¼” seam allowance. Repeat to make a total of four. Cut the sewn strip sets into 48) 1 ½” segments. They should measure 1 ½” x 1 ½” when pressed open.
here’s how we used THE CREATIVE GRIDS 4 IN 1 RULER TO MAKe HALF SQUARE TRIANGLES
OR please use your go to method for HSTs
MAKING HALF SQUARE TRIANGLE UNITS (HSTs) Pair each print 1 ½” wide strip RST (right sides together) with a 1 ½” background strip. Use your CGR 4 in 1 ruler* to cut sets of triangles. Chain piece paired triangles using a ¼” seam along the longest edge of the triangle pair. Press open and admire your work ☺*refer to markings on the ruler OR the printed instructions that come with the ruler for placement before cutting
ASSEMBLE BLOCKS:
Place one 1 1/2" center square, 4 HSTs & 4 Bars and Background units as shown here.
Stitch together as shown, use 1/4" seams throughout. Press and square up to 3 1/2" (unfinished size) if needed. Make 12 Blocks
QUILT ASSEMBLY:
Layout your blocks in 4 rows of 3, in an arrangement that pleases you. Using a 1” x WOF sashing strip, Cut 8) 1” x 3 ½” pieces. Sew these pieces to the right side of the first 2 blocks in each row. Press toward the sashing. Sew the rows of 3 together and press toward the sashing. Using the rest of the 1” sashing strips sew a strip between the rows as pictured.
Add the 2 1/2" border strips to the sides, press towards the border
Add the 2 1/2" border strips to the top and bottom. Press to the border. Layer, quilt, bind and then LOVE your quilt♥
If you make this mini , we'd love to see your version, please share a photo with us:
WAYS TO SHARE a photo with us:
Post your photo on Instagram and tag us # rockingchairquilts
post your photo on our Facebook page- CLICK HERE to get to the Facebook page.
Tweet a photo @makeaquilt or tag us in your tweet @MakeAQuilt
send your photo in an email to us : info@RockingChairQuilts.com
Please use the comments area below for your comments or questions
Thank you for reading, until we blog again, take some time to Enjoy the Sew!® - Carol
SIGN UP HERE IF YOU'D LIKE TO RECEIVE AN EMAIL WHEN A NEW BLOG POST IS PUBLISHED
Candy Corn Kaleidescope Quilt
Happy Halloween! Here’s a festive quilt for you to stitch. We’ve made ours with the CGRDBSKL CREATIVE GRIDS 45 DEGREE KALEIDOSCOPE DOUBLE STRIP QUILTING RULER if you don’t have this ruler you can use a similar 45° angled ruler (or template plastic to make a template to cut your triangle segments).

Here’s our quilt hanging in the shop for October. We used BELLA SOLIDS to make our quilt Two colors 9900 79 Ochre and 9900 60 Ivory. Scroll down for our mini-pictorial tutorial.

Creative Grids KALEIDOSCOPE RULER
Need more details on cutting your shapes and block construction?
Watch Rachel Cross demonstrate the Kaleidoscope block and ruler in her video .
What you need:
· Creative Grids Double Strip Kaleidoscope Ruler (CGRDBSKL) OR Creative Grids 45° Kaleidoscope & Dresden Plate Ruler (CGRTKAL45) or similar 45° angled ruler (or template plastic to make a template to cut your triangle segments)
· 2 ½ yards background (cream)
· 2 yards for blocks and binding (orange)
· 3 yards of backing fabric

Cut 2 1/2” strips from your fabric and sew into strip sets.

Use your Kaleidoscope ruler or template to cut triangle segments from your strip sets.

Alternate your triangle segments and sew together.

Create your corner triangles by cutting 3 1/4” squares on the diagonal.

Change the placement of your corner triangles to make the two different block styles you will need to create the kaleidoscope pattern in the featured quilt.

If you make this Quilt , we'd love to see your version, please share a photo with us:
WAYS TO SHARE a photo with us:
Add a photo in the comment section below ( you may need to log in to use this feature)
Post your photo on Instagram and tag us # rockingchairquilts
post your photo on our Facebook page- CLICK HERE to get to the Facebook page.
Tweet a photo @makeaquilt or tag us in your tweet @MakeAQuilt
send your photo in an email to me : Carol@RockingChairQuilts.com
If you live nearby you can pop in during SHOP HOURS each week we'll take photo of your quilt for you.
Please use the comments area below for comments and questions
Thank you for reading, until we blog again, take some time to Enjoy the Sew!® - Carol
SIGN UP HERE IF YOU'D LIKE TO RECEIVE AN EMAIL WHEN A NEW BLOG POST IS PUBLISHED
♥ ♥ ♥ Churning for You ♥ ♥ ♥
Happy Valentine's! Here's a darling mini Churn Dash quilt pattern for you to stitch. It's a scrappy happy little quilt. These miniature blocks (3" finished) don't need very big amounts of fabric to complete. You can probably find the fabrics you'll need in your scrap box.
A little more fabric is needed for the sashing and borders & binding -1/2 yard should do.
A Fat Quarter is enough for backing on this wee quilt.
For Valentine's I am starting with a pile of pinks, reds and some lights for background in my blocks. Look at all that delicious Moda Fabric! This mini would be charming made up in brights, low volume, civil war, ....almost any fabric that makes your quilter's heart happy♥
You'll need to make some Half Square Triangles (HSTs) for your mini Churn Dash blocks. In this tutorial I will showcase using the Creative Grids 4 in 1 Half Square Triangle Ruler CGRBH1 to make my HSTs......But you can create your your HST using any method you like for your little quilt. As long as they will finish to 1" x 1" size .
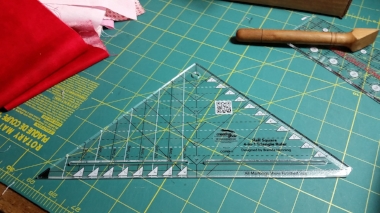
Creative Grids 4 in 1 Half Square Triangle Ruler (CGRBH1). Click on the ruler photo to learn more about this fun tool and watch a product video too.
♥♥CHURNING FOR YOU ♥♥
Valentine Mini Pattern from RockingChairQuilts.com
14 ½” x 18” finished Size
Tools: Rotary cutter, straight ruler and cutting mat
Creative Grids® Half-Square 4-in-1 Triangle Ruler - CGRBH1 (option A) Aurifil Threads to match or any color of Aurifil thread that makes you happy today☺
Fabrics:
½ yard for Border, blocks, sashing, binding:
Cutting:
Cut two 2 ½” x WOF (border)
Cut two 2 ½” x WOF (binding)
Cut three 1” x WOF (sashing)
Cut two 1” x WOF (blocks, cut in half at fold to make 4 pieces 1: x 21”)
Background -12” x 21” piece (or can be scrappy)
Cutting:
Cut four 1” x 21” (Blocks)
TO MAKE THE Half Square Triangles for your blocks use one of the following OPTIONS:
If using the Creative Grids® Half-Square 4-in-1 Triangle Ruler - CGRBH1. FOR EACH BLOCK you will need to cut strips of background and prints 1 ½” x 5” and pair them RST then use your 4 in 1 ruler to cut your HST segments (see illustrated steps below) each 1 ½” x 5” strip will make 4 HSTs – enough for one churndash block. If you want 12 different blocks you can use 12 different prints with your background fabric or you could make all your blocks alike and use only one color print strip with your background strips, or any combination in between.
Use triangle paper that makes 1” finished size HST.
Cut three 1 7/8” x 21”, from these strips cut 24 – 1 7/8” squares then cut on the diagonal to make 48 triangles. These background triangles will then be paired with print triangles to make 4 half square triangle units (HST) for each of your 12 blocks.
Use your OWN preferred method to make the 48 HST units
Blocks – up to 12 different prints - you’ll need a piece 3 x 7 for each block
Cutting:
Cut one 1 ½” square from a variety of prints (this is the center square) you will need 12
See Step 1 under the background cutting. Whichever method you want to use to make 48 HSTs you will need to cut the same size and amount from your variety of prints as you cut have cut from your background fabric.
I will be using the Creative Grids 4 in 1 ruler so I will cut a strip 1 ½” x 5” for each block I want to make. In my sample quilt, I made two or 3 blocks from each of 5 prints until I had a total of 12 blocks
Backing – Fat Quarter will work for your backing
Sewing:
MAKE BARS AND BACKGROUND UNITS: Using the 1” x 21” background and border strips. Pair a background strip to a border strip and sew with ¼” seam allowance. Repeat to make a total of four. Cut the sewn strip sets into 48) 1 ½” segments. They should measure 1 ½” x 1 ½” when pressed open.
USING THE CREATIVE GRIDS 4 IN 1 RULER TO MAKE YOUR HALF SQUARE TRIANGLES
MAKING HALF SQUARE TRIANGLE UNITS (HSTs) Pair each print 1 ½” wide strip RST (right sides together) with a 1 ½” background strip. Use your CGR 4 in 1 ruler* to cut sets of triangles. Chain piece paired triangles using a ¼” seam along the longest edge of the triangle pair. Press open and admire your work ☺*refer to markings on the ruler OR the printed instructions that come with the ruler for placement before cutting
ASSEMBLE BLOCKS:
Place one 1 1/2" center square, 4 HSTs & 4 Bars and Background units as shown here.
Stitch together as shown, use 1/4" seams throughout. Press and square up to 3 1/2" (unfinished size) if needed. Make 12 Blocks
QUILT ASSEMBLY:
Layout your blocks in 4 rows of 3, in an arrangement that pleases you. Using a 1” x WOF sashing strip, Cut 8) 1” x 3 ½” pieces. Sew these pieces to the right side of the first 2 blocks in each row. Press toward the sashing. Sew the rows of 3 together and press toward the sashing. Using the rest of the 1” sashing strips sew a strip between the rows as pictured.
Add the 2 1/2" border strips to the sides, press towards the border
Add the 2 1/2" border strips to the top and bottom. Press to the border. Layer, quilt, bind and then LOVE your quilt♥
If you make this mini , we'd love to see your version, please share a photo with us:
WAYS TO SHARE a photo with us:
Post your photo on Instagram and tag us # rockingchairquilts
post your photo on our Facebook page- CLICK HERE to get to the Facebook page.
Tweet a photo @makeaquilt or tag us in your tweet @MakeAQuilt
send your photo in an email to me : Carol@RockingChairQuilts.com
If you live nearby you can pop in during SHOP HOURS each week we'll take photo of your quilt for you.
Please use the comments area below for comments and questions
CLICK BELOW TO LIKE US ON FACEBOOK
Thank you for reading, until we blog again, take some time to Enjoy the Sew!® - Carol
SIGN UP HERE IF YOU'D LIKE TO RECEIVE AN EMAIL WHEN A NEW BLOG POST IS PUBLISHED
#MODA FABRICS #AURIFIL Bright Day Fabric Bundle Giveaway
THIS GIVEAWAY HAS ENDED, CONGRATULATIONS TO cAROL yATES! THANKS SO MUCH TO ALL WHO ENTERED, BE SURE TO LIKE US ON FACEBOOK AND SUBSCRIBE TO THIS BLOG SO YOU WILL KNOW WHEN THE NEXT GIVEAWAY BEGINS.

Hello you beautiful bright bundle: 40 count fat quarters of Fiji Batiks from Moda Fabrics and 3 AURIFIL BIG SPOOLS of 50 wt MAKO COTTON MSRP $179.99 (yowsa)
We've had a fairly mild winter here, were we work and live at Rocking Chair Quilts. Not bitterly cold. nor a great deal of snowfall, but I must say that the sunny days have been few and far between this season.
To brighten our moods and celebrate the sunny days that we do get to enjoy, we are hosting this giveaway of a BRIGHT bundle of Moda Fiji Batiks and AURIFIL threads.
Soon we'll be enjoying the early Spring and all the sunshine that those days will bring.
While we wait for those bright days ahead, what could be better than busting open this colorful bundle and starting a cheerful quilt (or two) ?
Leave a comment on this blog post to enter for a chance to win this prize . You can submit even MORE entries when you use the Raffle-copter widget (click inside the white box below).
This giveaway ends Friday, February 10th at 11:59 p.m. CST.

I ♥ AURIFIL


I ♥ MODA
To read All the usual rules that apply to our regular giveaways and sew on and sew forth CLICK HERE
THIS GIVEAWAY HAS ENDED, CONGRATULATIONS TO CAROL YATES! THANKS SO MUCH TO ALL WHO ENTERED, BE SURE TO LIKE US ON FACEBOOK AND SUBSCRIBE TO THIS BLOG SO YOU WILL KNOW WHEN THE NEXT GIVEAWAY BEGINS.
CLICK TO LIKE US ON FACEBOOK>
thank you so much for reading this and being a part of our giveaway.
Until we blog again take time out to Enjoy the Sew!®- Carol
SIGN UP HERE TO RECEIVE AN EMAIL WHEN A NEW BLOG POST IS PUBLISHED:

#Moda Super Heroes on the Go
SUPER HEROES ON THE GO
Tote & Simple Wallet: A free pattern from RockingChairQuilts.com
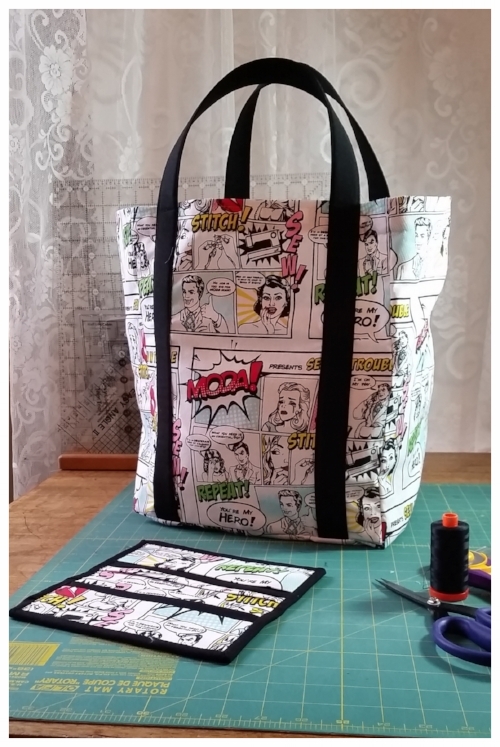
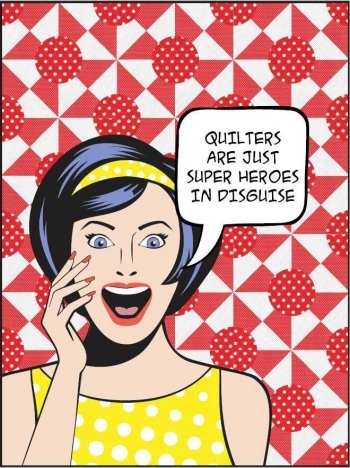
Do you know Moda Man? The saga of how he saves a damsel in distress is captured forever on a fine cotton canvas. We have been enjoying this 'Super Heroes In Disguise' fabric from Moda United Notions here at RockingChairQuilts.com. We first met Moda Man in Moda City at 2016 Fall Quilt Market in Houston. When this amusing fabric arrived here at the shop, we got busy and made this roomy Super Heroes on the Go Tote Bag and a simple wallet. This is a big, roomy tote because of its flat bottom . It makes a great re-usable grocery tote - or maybe it could be used to carry a lot of quilty items out of your local quilt shop ;) Thanks so much to the kind folks at Moda Fabrics for keeping our quilting life full of wonderful choices!
TOTE MATERIALS:
2/3 yard MODA ® Super Heroes canvas weight fabric for tote
1/3 yard Moda Bella Super Black Solid for handles
1/8 yard 44” wide Décor Bond (optional handle reinforcement)
Optional: 12"x 8 1⁄2" cardboard for bottom
SIMPLE WALLET MATERIALS
1/3 yard Super Heroes canvas fabric
1/4 yard* Moda Bella Super Black Solid for binding *more is needed if you want to make bias binding.
8” square Décor Bond (optional - gives your wallet some stiffness, leave it out if you want a flopsy wallet☺
TOTE CUTTING:
Tote Fabric (Super Heroes canvas) • CUT two pieces 16"x12 ½” for front and back • CUT two piece 9" x 22" rectangles for sides and bottom
Handle fabric (black) • Cut two pieces 5" x 44" for handles. • optional - If you want your handles stronger- reinforce with Décor Bond – cut 2 pieces 1- 1/4” x 44”
The 'Super Heroes In Disguise' fabric is directional so we have some tips for you on cutting out the bag panels. Then, when you stitch them together your Super Heroes are all headed in the right direction on your finished tote.

Start with 2/3 of a yard of Moda Super Heroes canvas fabric. Trim off the selvedge edges and the fold edge with a rotary cutter. Keep the edges square and straight.

Double thickness of canvas fabric is shown here.

cut out bag front and back, then cut 2 pieces 9" x 22" to make sides/bottom panel of your tote, as shown.

Photo #8
Put the two 9" x 22" side/bottom pieces right sides together making sure the images will be facing upright on both sides of your bag, then sew (or serge) them together with 1/4" seam along the bottom 9" edge. (bottom center seam)
After stitching the bottom center seam the two 9" x 22" panels will face in opposite directions. Your side/ bottom panel piece should now measure 9” x 43 ½”. (see photo #8)
ASSEMBLY:

1. Fold black handle pieces in half lengthwise and press. Open and fold edges in to middle. Refold and press. Open handle fabric back out and Place cut strip of Décor Bond with one edge along center pressed line in fabric. Press Décor Bond in place,

3. Reinforce bottom corners of tote front and back with stay stitching ¼” from tote edge and clip corners to stay stitching. This will help ease the bag corner seam as you stitch the front and back pieces to the long sides/bottom panel.
Place inside edge of handle 3" in from each edge of front. Top stitch both sides of handle to bag, but STOP stitching about 5" from the top (see picture #4). Repeat with back piece.

2. After pressing Décor Bond in place, refold edges of handle fabric back to middle enclosing the strip of Décor bond inside the handle fabric. Baste with matching Aurifil thread along open edges of handle .

4. STOP stitching about 5" from the top of the bag. Repeat with back piece. (you will finish stitching the handles down after you hem the top of your bag).
5. Pin front piece RIGHT SIDES TOGETHER to the long seamed side/bottom panel 9" x 43 1/2" (clipping seam allowance to stay stitching where needed and pivoting at corners). Stitch. Repeat with back piece.
Press seams toward sides. Optional: seams can then be finished with zigzag stitching or serging. Be careful to keep handles free.

6. Fold down 1 ½” all along top edge of tote and press. Now turn raw edge under 1⁄4" and press. Pin in place if needed. Then stitch top hem in place keeping handles free.

7. Now ....where you had left the top 5” of the handles free from the bag- it is time to stitch those down. SO Continue top stitching handles to outside of tote and all along handle edges, over basting. To secure, reinforcing by stitching an X or a box at top edge of tote.
8. Optional: Cover 12" x 8 1/2" cardboard rectangle with fabric and place in bottom of tote. Sometimes instead of cardboard I cut my tote rectangles out of old rotary cutting mats that have gotten too cut up to use for anything else. They don't bend or get soggy like cardboard sometimes does ☺.
SIMPLE WALLET
CUTTING:
- Cut 2 rectangles 8” x 4 ¼” canvas (outside wallet piece) *NOTE: because your outside wallet fabric is directional you will cut 2 rectangles 8” x 4 ¼” then pivot one of the rectangles 180 degrees . (See photo #9) Now stitch the two 8 x 4 ¼” rectangles (right sides together) along the 8” edge. This stitched piece should now measure 8” x 8”. This is done so that the directional print of your SUPER HEROES fabric will be going in the right direction when you look at the outside of your wallet. If you don’t mind where your superheroes are headed you can just cut one 8” x 8” square for the outside piece of your wallet.
- Cut one 8" square* canvas (inside)
- Cut one 8" square Decor Bond (optional)
POCKETS from SUPERHEROES CANVAS (photo #10):
- Cut two 8"x 7" (large pockets)
- Cut two 8"x 4" (smallest pockets)
from Moda Bella Solid cut two 8"x 51⁄2" (middle pockets)
BINDING FABRIC: from Moda Bella Solid Cut one 1 1⁄2"x 34" (binding). If you want to cut your binding fabric on the bias you will need more fabric than the 1/8 yard shown in materials list.

Photo # 10 : Cut 2 each of the 3 pocket pieces: small (canvas), middle (black) and large (canvas).

Photo #9

Photo #11: Press all pockets in half lengthwise, Right sides together

Photo #12: stack pressed pocket pieces, keeping raw edges even.

ASSEMBLY: Fold all pieces for pockets in half lengthwise and press (photo #11). Place optional square of Décor Bond on the wrong side of the inside 8" wallet canvas fabric square, press to secure the Decor Bond to the wallet square. Put the inside and outside 8" wallet squares wrong sides together, with inside wallet fabric facing up. Beginning with largest pocket, place on inside aligning edges and bottom on top and bottom of wallet. Continue with each pocket. Baste around all edges. Catching in all layers.
FINISHING: Fold 1-1⁄2"x 34" BINDING piece in half lengthwise and press. Open and fold edges to middle. Refold and press. Stitch binding to of basted edge of simple wallet, pivoting/mitering at corners so they lay nicely. (or cut and apply binding with your favorite method).
Thanks for reading - I hope you will enjoy making a tote , This is a big, roomy tote because of its flat bottom . It makes a great re-usable grocery tote - or maybe it could be used to carry a lot of quilty items out of your local quilt shop. It would be fun to make using other pretty fabrics as well. If you decide to make one, please share a picture of your finished tote:
WAYS TO SHARE A PHOTO OF YOUR tote WITH US:
- Post your photo on Instagram and tag us # rockingchairquilts
- post your photo on our Facebook page- CLICK HERE to get to the Facebook page.
- Tweet a photo @makeaquilt or tag us in your tweet @MakeAQuilt
- send your photo in an email to me : Carol@RockingChairQuilts.com
- If you live nearby you can pop in during SHOP HOURS each week we'll take photo of your quilt for you.
- Please use the comments area below for comments and questions
Until we blog again - Enjoy the Sew!® - Carol