Quick to make, this charming fabric box is sure to delight it's maker. The Bitsy Box has been popping up all over sewing social media Since it’s debut. “This pattern should come with a Warning Label – Making Bitsy Boxes can be highly addictive.”- Carrie Nelson.
So at the risk of adding to my already burgeoning quilting/sewing addiction, I decided to make a bitsy box of my own (or 2 ….or many☺).
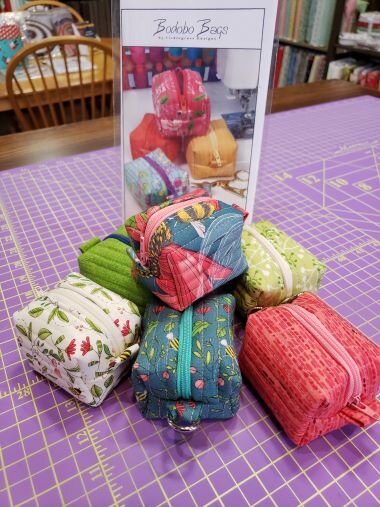
I found that the Bitsy Box pattern designed by Natalie Rawlinson of Ticklegrass Designs is well-written. Bitsy Boxes don’t take long and are easy to make,
You might ask “Aren’t zippers hard to put in?” I would confess that if you haven’t done it before sewing in zippers can seem challenging , but not so with Natalie’s Bitsy Box . Her pattern has full-color pictures for each step, so it’s easy to follow along.
If you profess to have a fear of zippers I encourage you to give the Bitsy Box a try. They’re a good project for zipper beginners. A confident beginner sewist can put one together in less than an hour (and aren’t they cute?)
What you need:
Fabric - Two 6” x 9” pieces of fabric., one for the inside and one for the outside of your box
1 nylon or plastic zipper. (metal zippers won’t work for a bitsy box)
Soft & Stable White or similar foam stabilizer, I used In R Foam Single sided fusible foam for my boxes
50wt. thread to coordinate with outer fabric and lining. You’ll be quilting your fabric sandwich before your build it into a wee bag.
3/4″ D-rings – optional.
Wash away Wonder Tape for zipper installation( this is optional and can be helpful if you have trouble getting your zipper to behave like you want it too)
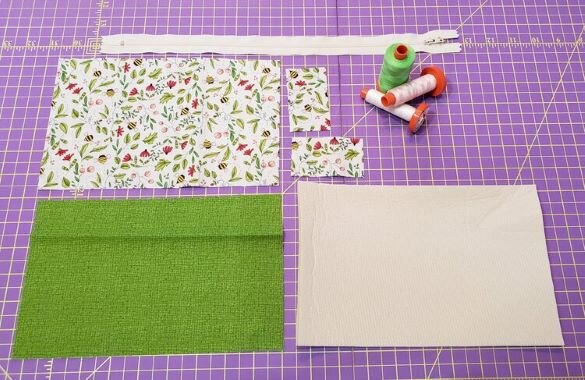
Start by cutting the fabrics for the outside, inside lining, and then cut the foam. Cut your shapes for the tabs. Fabrics shown here are from PAINTED MEADOW by Robin Pickens

Layer your fabrics and foam, then quilt. Quilting is optional if you use a fusible foam stabilizer like IN-R- FOAM. Trim up your quilted piece as directed in the pattern.

Install your zipper.

Follow the steps in your pattern to complete box construction.

All done in no time! See Natalie’s pattern for her fun ideas to add variety to the way you finish your boxes
If you make a bitsy box, we'd love to see your version, please share a photo with us:
WAYS TO SHARE a photo with us:
Add a photo in the comment section below ( you may need to log in to use this feature)
Post your photo on Instagram and tag us # rockingchairquilts
post your photo on our Facebook page- CLICK HERE to get to the Facebook page.
Tweet a photo @makeaquilt or tag us in your tweet @MakeAQuilt
send your photo in an email to me : Carol@RockingChairQuilts.com
If you live nearby you can pop in during SHOP HOURS each week we'll take photo of your bitsy boxes for you.
Please use the comments area below for comments and questions
Thank you for reading, until we blog again, take some time to Enjoy the Sew!® - Carol

SIGN UP HERE WITH YOUR EMAIL ADDRESS, IF YOU'D LIKE TO RECEIVE NOTICE WHEN A NEW BLOG POST IS PUBLISHED